Installing rpy2 in Windows 10

I recently had to install rpy2 for a project and I found it now has become much easier to install it in Windows environment (basically you can just use pip install rpy2)

I'm posting this I can refer to it later --- hopefully it is useful for others as well.

The software versions I'm using are:

  • Python 3.8.3 installed via Anaconda3-2020.07-Windows-x86_64.exe

  • R 4.0.2 via R-4.0.2-win.exe

    • I did use Save version number in registry option during the installation, which was checked by default. See the discussion below for potential issues of not using this option.

You can first install rpy2 via pip:

> pip install rpy2

Now if you try to import rpy2 in python, for example using import rpy2.robjects as robjects, you will get the following error:

OSError: cannot load library 'C:\Program Files\R\R-4.0.2\bin\x64\R.dll': error 0x7e

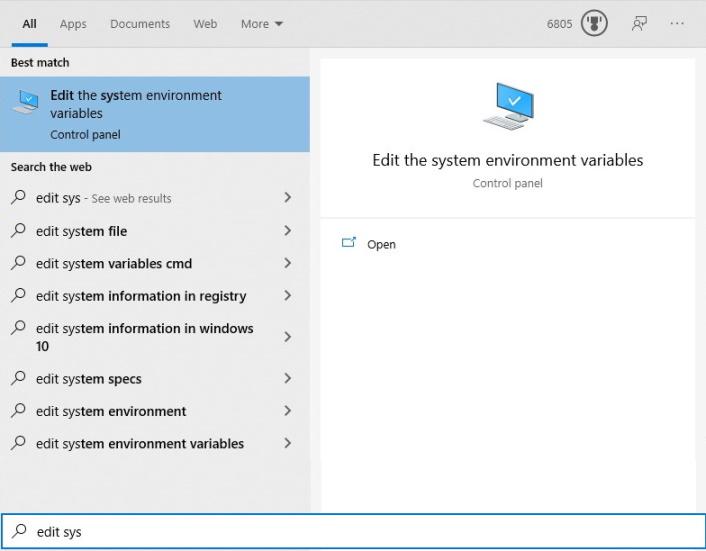
Generally in Windows, dll errors can be solved by adding the path to it to your PATH environmental variable. In the start menu, search for Edit the system environmental variables and run it:

../../images/install-rpy2-windows-10/start-menu-edit-system-env-vars.jpg

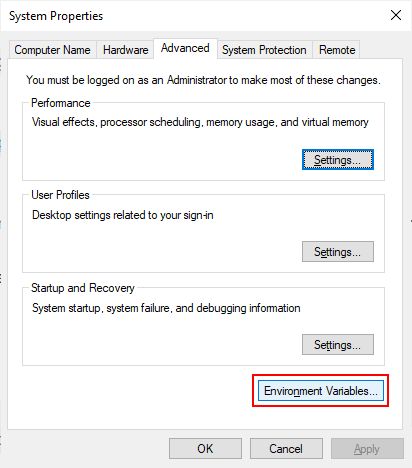
You can click on Environmental Variables:

../../images/install-rpy2-windows-10/environmental-variables.png

There, you can click on the Path System variable,

../../images/install-rpy2-windows-10/path-environmental-variable.png

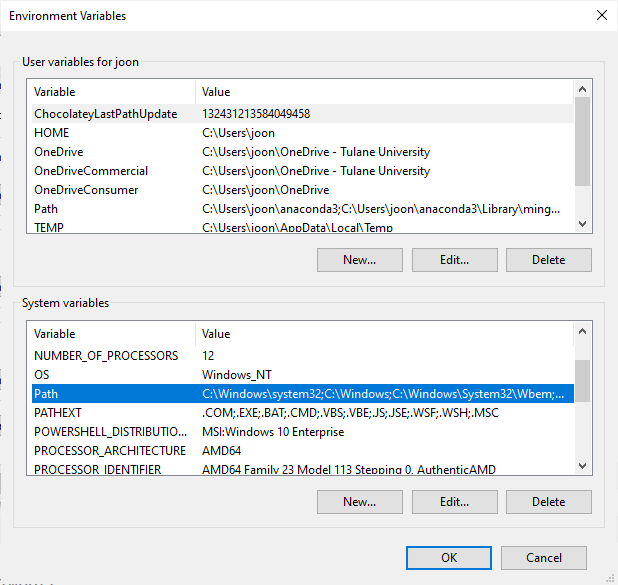
and add C:\Program Files\R\R-4.0.2\bin\x64\:

../../images/install-rpy2-windows-10/adding-path.png

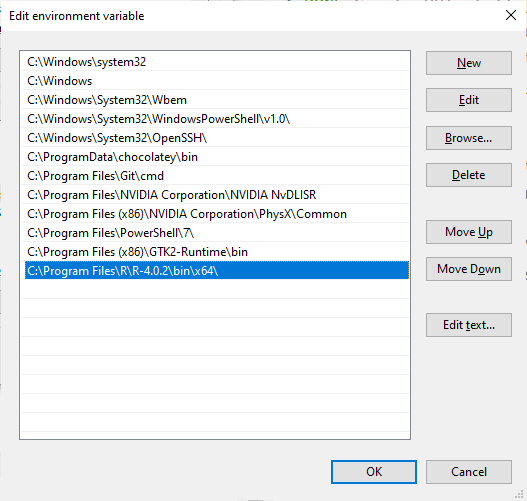
(Obviously, if you are using different versions of R, you have to change the version number part of the path accordingly).

That is it. Comparing to the experience I had several years ago, it is now much more convenient. You can check the installation by:

import rpy2
for row in rpy2.situation.iter_info():
    print(row)

which gave me:

rpy2 version:
3.3.5
Python version:
3.8.3 (default, Jul  2 2020, 17:30:36) [MSC v.1916 64 bit (AMD64)]
Looking for R's HOME:
    Environment variable R_HOME: None
    InstallPath in the registry: C:\Program Files\R\R-4.0.2
    Environment variable R_USER: None
    Environment variable R_LIBS_USER: None
R version:
    In the PATH:
    Loading R library from rpy2: OK
Additional directories to load R packages from:
None
C extension compilation:
    Warning: Unable to get R compilation flags.

So it does look like it relies on InstallPath in the registry to identify the location of R installation. So if you did not add the item to the registry, you can add an environmental variable called R_HOME, with C:\Program Files\R\R-4.0.2.

My PowerShell Customizations

I describe my customizations for PowerShell. With these, my PowerShell terminal looks like the following screenshot. Not only these customizations make it look great, but also they make me productive in the command line in Windows.

../../images/posh_prompt.png

ConEmu

I use ConEmu as my terminal emulator. ConEmu provides tabbed sessions, changing color schemes on-the-fly, and many customization options.

Color Themes

The screenshots are taken with moe-dark theme. ConEmu comes with many color schemes, and I also maintain a github repository which contains my favorite color themes for ConEmu. You can check out the GitHub repository.

posh-git and prompt customization

To get git-related information on your prompt, you should get posh-git. Then, you can show the git-related information along with other useful information by modifying prompt() function. I have two separate example customization code snippets for posh-git v1.x (currently in beta) and v0.x, the two versions that are available as of March 2020. Both should produce the same prompt.

v1.x (e.g., v1.0.0)

# http://serverfault.com/questions/95431
function Test-Administrator {
    $user = [Security.Principal.WindowsIdentity]::GetCurrent();
    (New-Object Security.Principal.WindowsPrincipal $user).IsInRole([Security.Principal.WindowsBuiltinRole]::Administrator)
}

Import-Module -Name posh-git

$GitPromptSettings.PathStatusSeparator = ''
$GitPromptSettings.AfterStatus.Text += " "

function prompt {
    $origLastExitCode = $LastExitCode

    $prompt = ""

    $prompt += Write-VcsStatus

    if (Test-Administrator) {  # if elevated
        $prompt += Write-Prompt "(Elevated) " -ForegroundColor White
    }

    $prompt += Write-Prompt "$env:USERNAME@" -ForegroundColor Red
    $prompt += Write-Prompt "$env:COMPUTERNAME" -ForegroundColor Yello
    $prompt += Write-Prompt " : " -ForegroundColor DarkGray

    $prompt += Write-Prompt "$($GitPromptSettings.DefaultPromptPath.Expand().Text)" -ForegroundColor Green
    $prompt += Write-Prompt " : " -ForegroundColor DarkGray
    $prompt += Write-Prompt (Get-Date -Format G) -ForegroundColor Blue
    $prompt += Write-Prompt " : " -ForegroundColor DarkGray

    $prompt += Write-Prompt "`n$(if ($PsDebugContext) {' [DBG]: '} else {''})" -ForegroundColor Magenta
    $prompt += "$('>' * ($nestedPromptLevel + 1)) "

    $LastExitCode = $origLastExitCode
    $prompt
}

v0.x (e.g., v0.7.3)

# http://serverfault.com/questions/95431
function Test-Administrator {
    $user = [Security.Principal.WindowsIdentity]::GetCurrent();
    (New-Object Security.Principal.WindowsPrincipal $user).IsInRole([Security.Principal.WindowsBuiltinRole]::Administrator)
}

function prompt {
    # https://github.com/dahlbyk/posh-git/wiki/Customizing-Your-PowerShell-Prompt
    $origLastExitCode = $LastExitCode
    Write-VcsStatus

    if (Test-Administrator) {  # if elevated
        Write-Host "(Elevated) " -NoNewline -ForegroundColor White
    }

    Write-Host "$env:USERNAME@" -NoNewline -ForegroundColor Red
    Write-Host "$env:COMPUTERNAME" -NoNewline -ForegroundColor Yellow
    Write-Host " : " -NoNewline -ForegroundColor DarkGray

    $curPath = $ExecutionContext.SessionState.Path.CurrentLocation.Path
    if ($curPath.ToLower().StartsWith($Home.ToLower()))
    {
        $curPath = "~" + $curPath.SubString($Home.Length)
    }

    Write-Host $curPath -NoNewline -ForegroundColor Green
    Write-Host " : " -NoNewline -ForegroundColor DarkGray
    Write-Host (Get-Date -Format G) -NoNewline -ForegroundColor Blue
    Write-Host " : " -NoNewline -ForegroundColor DarkGray
    $LastExitCode = $origLastExitCode
    "`n$('>' * ($nestedPromptLevel + 1)) "
}

Import-Module -Name posh-git -RequiredVersion 0.7.3

$global:GitPromptSettings.BeforeText = '['
$global:GitPromptSettings.AfterText  = '] '

Color coding Get-ChildItem

To color-code the results of Get-ChildItem, I use my own Get-ChildItemColor. Once you install it, you can set aliases to the exposed functions:

If (-Not (Test-Path Variable:PSise)) {  # Only run this in the console and not in the ISE
    Import-Module Get-ChildItemColor

    Set-Alias l Get-ChildItemColor -option AllScope
    Set-Alias ls Get-ChildItemColorFormatWide -option AllScope
}

so you have colored versions of l and ls equivalents.

PSReadLine

PSReadLine makes PowerShell to behave like zsh, which is my favorite shell in GNU/Linux. It gives you substring history search, incremental history search, and awesome tab-completion. The following is my current setup:

Import-Module PSReadLine

Set-PSReadLineOption -HistoryNoDuplicates
Set-PSReadLineOption -HistorySearchCursorMovesToEnd
Set-PSReadLineOption -HistorySaveStyle SaveIncrementally
Set-PSReadLineOption -MaximumHistoryCount 4000
# history substring search
Set-PSReadlineKeyHandler -Key UpArrow -Function HistorySearchBackward
Set-PSReadlineKeyHandler -Key DownArrow -Function HistorySearchForward

# Tab completion
Set-PSReadlineKeyHandler -Chord 'Shift+Tab' -Function Complete
Set-PSReadlineKeyHandler -Key Tab -Function MenuComplete

With these settings, I can press up and down arrows for history substring search, and the tab completion shows me available candidates. For example:

../../images/posh_PSReadLine_tab_completion.png

You can also use CTRL + r for incremental history search.

Others

cddash

You can use the following to have the "dash" functionality - namely, you can go back to the previous location by typing cd -. It is from http://goo.gl/xRbYbk.

function cddash {
    if ($args[0] -eq '-') {
        $pwd = $OLDPWD;
    } else {
        $pwd = $args[0];
    }
    $tmp = pwd;

    if ($pwd) {
        Set-Location $pwd;
    }
    Set-Variable -Name OLDPWD -Value $tmp -Scope global;
}

Set-Alias -Name cd -value cddash -Option AllScope

Boost startup speed

If you feel it takes a lot of time to start a PowerShell session due to your profile script, I found running the following (I saved it as ngen.ps1) in an elevated PowerShell helps a lot.

$env:path = [Runtime.InteropServices.RuntimeEnvironment]::GetRuntimeDirectory()
[AppDomain]::CurrentDomain.GetAssemblies() | % {
  if (! $_.location) {continue}
  $Name = Split-Path $_.location -leaf
  Write-Host -ForegroundColor Yellow "NGENing : $Name"
  ngen install $_.location | % {"`t$_"}
}

Source: http://stackoverflow.com/questions/4208694/.

Changelog

[2020-03-01 Sun]
  • Add prompt customization for both posh-git versions v1.x and v0.x.

[2017-04-22 Sat]
  • Update prompt customization script for the latest version of posh-git (0.7.2)

  • Update Git-ChildItemColor related information

[2017-01-03 Tue]
  • Update prompt customization script for the latest version of posh-git

Syntax highlighting in LaTeX export in org-mode: specifying outputdir option for minted package

When you do LaTeX export in org-mode, you can get syntax highlighting in pdf output using minted package, which uses pygments. You can add the following in your init file:

(require 'ox-latex)
(add-to-list 'org-latex-packages-alist '("" "minted"))
(setq org-latex-listings 'minted)

(setq org-latex-pdf-process
      '("pdflatex -shell-escape -interaction nonstopmode -output-directory %o %f"
        "pdflatex -shell-escape -interaction nonstopmode -output-directory %o %f"
        "pdflatex -shell-escape -interaction nonstopmode -output-directory %o %f"))

The problem with this is that if you want to export the document to a output directory, (e.g., using :EXPORT_FILE_NAME: ./Output/File_Name property), then you will get the following error:

! Package minted Error: Missing Pygments output; \inputminted was
probably given a file that does not exist--otherwise, you may need
the outputdir package option, or may be using an incompatible build tool.

because minted does not know where to find the intermediate file.

My solution is first commenting out the minted package part:

(require 'ox-latex)
;(add-to-list 'org-latex-packages-alist '("" "minted"))
(setq org-latex-listings 'minted)

(setq org-latex-pdf-process
      '("pdflatex -shell-escape -interaction nonstopmode -output-directory %o %f"
        "pdflatex -shell-escape -interaction nonstopmode -output-directory %o %f"
        "pdflatex -shell-escape -interaction nonstopmode -output-directory %o %f"))

and then manually load minted package with specifying outputdir option in the org file:

* Test
:PROPERTIES:
:EXPORT_FILE_NAME: Output/File_Name
:EXPORT_LATEX_HEADER+: \usepackage[outputdir=Output]{minted}
:END:

and it should work.

Last, if you want to highlight ipython block, you can add the following to your init file:

(add-to-list 'org-latex-minted-langs '(ipython "python"))

Windows 10: How to Enable Dark mode in PowerShell

With Windows 10 Anniversary Update, one can choose between the light and dark modes. Here is a set of PowerShell commands to set this in case you want to automate it. These are slightly modified commands from this reddit post.

To use the dark mode:

Set-ItemProperty -Path HKCU:\SOFTWARE\Microsoft\Windows\CurrentVersion\Themes\Personalize -Name AppsUseLightTheme -Value 0

To use the light mode:

Set-ItemProperty -Path HKCU:\SOFTWARE\Microsoft\Windows\CurrentVersion\Themes\Personalize -Name AppsUseLightTheme -Value 1

Lenovo Y50 UHD Laptop: Driver Recommendations and Troubleshooting Information

Lenovo Y50 UHD is a laptop with good specs (especially for the price), as it has a high-end quad-core processor (i7-4700HQ, passmark 7750+ ), 16GB Ram, 256GB SSD, UHD display (3840x2160), Nvidia Geforce GTX 860M GPU, etc. The problem is that it suffers from many driver issues, making it unnecessarily frustrating to use. At first I had several problems, but now my machine is pretty reliable and stable, and I want to document driver recommendations and troubleshooting information. I'm using Windows 10.

I feel the most important things to take care of are the SSD lock-up issue and the Nvidia driver. I will keep this post updated as we get more driver updates.

SSD Lock-up

The system becomes not responsive for 30~ seconds, Task Manager shows 100% disk usage, while no process is using the disk.

The solution is using Standard SATA AHCI Controller instead of intel's for IDE ATA/ATAPI controllers in Device Manager.

  1. Right click on the Intel(R) 8 Series Chipset Family SATA AHCI Controller and click on Update Driver Software ..

  2. Select Browse my computer for driver software

  3. Select Let me pick from a list of ...

  4. Choose and install Standard SATA AHCI Controller

  5. Reboot

A major Windows 10 update will revert the driver back to the Intel's, so you have to manually do this again if it happens.

Nvidia Driver for GTX 860M

It seems GTX 860M suffers from driver issues more than other desktop GPU's. If you install a wrong version of the driver, you will suffer from performance issues, crashes, and even BOSDs. Please do not update Nvidia driver without checking the web and make sure it does not have any problems.

Touchpad loses gestures after waking up

Sometimes after waking up, the Synaptics touchpad will lose gestures such as three-finger swipe. Albeit not a permanent fix, running the following batch file will reset the touchpad and bring back gestures. (I saved it as synaptics_touchpad_reset.bat) and run it whenever it doesn't work.

taskkill -f -im syntpenh.exe
cd C:\Program Files\Synaptics\SynTP
start "" "syntpenh.exe"
exit

Enabling Touchpad 2- and 3-finger tap

If you want to enable touchpad 2- and 3-finger tap - for example, 2-finger tap for the right-click and 3-finger tap for the middle-click, you can follow the instructions at this thread.

In sum, what you need to do is, hit windows key + x, select run, enter regedit then hit enter, and on the left pane browse to the following location:

HKEY_USERS\<SID name for your current user>\Software\Synaptics\SynTP\TouchPadPS2

Only issue for me was that I had two entries, TouchPadSMB2cTM2334 and TouchPadPS2TM2334, and TouchPadSMB2cTM2334 was the one that worked.

Then, in the right pane, change values of according to the following:

2FingerTapAction

2 for right click, 4 for middle click.

2FingerTapPluginID

clear any value it may have

3FingerTapAction

2 for right click, 4 for middle click.

3FingerTapPluginID

clear any value it may have

3FingerTapPluginActionID

0

Reboot and the 2- and 3-finger taps will work.

Native desktop (toast) notifications for org-mode appointments in Windows

I describe how to set up native desktop notifications (Toast notifications) for org-mode appointments in Windows 8+.

Install toast

I use toast.exe from toaster project: https://github.com/nels-o/toaster. You can git clone the whole repo which includes the executable:

> git clone https://github.com/nels-o/toaster.git

Emacs Settings

The following is pretty much the same to https://lists.gnu.org/archive/html/emacs-orgmode/2013-02/msg00644.html. You can modify appt-message-warning-time and appt-display-interval to your need:

(require 'appt)
(setq appt-time-msg-list nil)    ;; clear existing appt list
(setq appt-display-interval '5)  ;; warn every 5 minutes from t - appt-message-warning-time
(setq
  appt-message-warning-time '15  ;; send first warning 15 minutes before appointment
  appt-display-mode-line nil     ;; don't show in the modeline
  appt-display-format 'window)   ;; pass warnings to the designated window function
(appt-activate 1)                ;; activate appointment notification
(display-time)                   ;; activate time display

(org-agenda-to-appt)             ;; generate the appt list from org agenda files on emacs launch
(run-at-time "24:01" 3600 'org-agenda-to-appt)           ;; update appt list hourly
(add-hook 'org-finalize-agenda-hook 'org-agenda-to-appt) ;; update appt list on agenda view

Next, specify the path to your toast executable (note that I'm using UNIX-style path here, seems to be working well):

(defvar toast-notifier-path
  "/home/joon/Programs/toast/bin/Release/toast"
  )

Set up the call to toast:

;; set up the call to the notifier
(defun toast-appt-send-notification (title msg)
  (shell-command (concat toast-notifier-path
                         " -t \"" title "\""
                         " -m \"" msg "\"")))

;; designate the window function for my-appt-send-notification
(defun toast-appt-display (min-to-app new-time msg)
  (toast-appt-send-notification
    (format "Appointment in %s minutes" min-to-app)    ;; passed to -t in toast call
    (format "%s" msg)))                                ;; passed to -m in toast call

(setq appt-disp-window-function (function toast-appt-display))

Now Emacs will use toast to notify you of upcoming appointments:

../images/toast_example.png

If you want to be fancier, you can show an icon in the notification as well. You can download an icon (from http://www.easyicon.net/language.en/540985-org_mode_icon.html, for example) and modify toast-appt-send-notification by adding -p argument (you have to use Windows-style path here):

;; set up the call to the notifier
(defun toast-appt-send-notification (title msg)
  (shell-command (concat toast-notifier-path
                         " -t \"" title "\""
                         " -m \"" msg "\""
                         " -p C:\\Users\\joon\\Programs\\Assets\\Icons\\org_mode_256px_540985_easyicon.net.png")))

which makes notifications look very nice:

../images/toast_example_with_icon.png

How to set up inverse and forward search in LyX for Windows

I describe how to set up inverse and forward search in LyX for the Windows environment, with SumatraPDF as the pdf viewer. Inverse search lets you quickly move to the corresponding part of a LyX (or LaTeX) source from its pdf output, typically by clicking on the text in the pdf viewer. Forward search works in the opposite direction; from the LyX (or LaTeX) source, you can invoke forward search to make the pdf viewer scroll through the pdf document so the output counterpart of the source is shown. They are very useful especially when you are editing a long document. Most of the instructions overlap with those found at http://wiki.lyx.org/LyX/SyncTeX#toc3.

LyX

  1. Set Tools > Preferences > Paths > LyxServer pipe to \\.\pipe\lyxpipe.

  2. In Document > Settings > Output, check Synchronize with output. (this is checked by default)

Scripts

Create a batch file named lyxeditor.cmd with the following contents and save it to one of the locations in your PATH Windows environmental variable so the pdf editor can call it:

@echo off
SETLOCAL enabledelayedexpansion
set file=%1
set row=%2
REM remove quotes from variables
set file=!file:"=!
set row=!row:"=!
%comspec% /q /c (@echo LYXCMD:revdvi:server-goto-file-row:%file% %row%)> \\.\pipe\lyxpipe.in&&type \\.\pipe\lyxpipe.out
endlocal

The above cmd works well, but it shows an annoying black cmd window when you invoke the script. With a simple AutoHotkey script, one can not only suppress this window but also activate the LyX window after the inverse search.

Create an AutoHotkey script named lyx-inverse-search.ahk with the following code and save it to the same location at lyxeditor.cmd and compile it with the AutoHotkey to generate lyx-inverse-search.exe:

SetTitleMatchMode, RegEx
Run, lyxeditor.cmd "%1%" "%2%",, Hide
WinActivate, ahk_exe lyx.exe,,,

If you don't have AutoHotkey installed, you can also download the pre-compiled file.

SumatraPDF

SumatraPDF is good because you can recompile your LaTeX document while the pdf is open with SumatraPDF and the viewer will automatically refresh the pdf file. Some pdf viewers will lock the pdf file and will not let you re-generate the pdf file unless you close the file first. It also supports inverse and forward search nicely.

  1. Download and install Sumatra PDF.

  2. In LyX, go to Tools > Preferences > Paths and append the install location of SumatraPDF to PATH prefix. For example, C:\Program Files\SumatraPDF.

Changelog

[2018-07-16 Mon]

  • Update AutoHotkey script to correctly identify LyX window to activate

Installing GNU Scientific Library (GSL) and CythonGSL in Windows

I describe how to install GNU Scientific Library (GSL) for CythonGSL in Windows.

CythonGSL is a great module which expose functions of GNU Scientific Library (GSL) to Cython so you can use them in your Cython extension modules conveniently.

In GNU/Linux, you can install GSL library with development header files with a one liner (for example, $ sudo zypper install gsl-devel in openSUSE), but in Windows it is a bit more involved, and if you are not familiar with these kind of stuff (like me) it can take hours to figure out what is wrong. I hope this post will save some time for others.

In sum, you need to do 1) download and unpack GSL with header files and right architecture, 2) set LIB_GSL environmental variable to the GSL directory, and 3) add the path to the bin subdirectory of the GSL directory to PATH environmental variable.

1 Download

1.1 GSL

oscats project has the latest GSL Windows DLL and headers for both 32 and 64-bit. Make sure you download the one for the right architecture (the same one as your Python installation). For example, gsl-1.15-dev-win64.zip for the 64-bit.

1.2 CythonGSL

If you use git, you can download CythonGSL with git clone:

git clone git://github.com/twiecki/CythonGSL.git

or you can just download the zip archive of the master branch.

2 Installing GSL

Just extract the downloaded file to your preferred location such as C:\lib64\GSL or C:\Users\YourName\lib\GSL. In general it is good idea to not have any spaces in the path. From now on I will assume that you have extracted the archive file into C:\lib64\GSL, so if you extract it into different location, change the path accordingly when you follow the instructions below.

3 Environmental Variables

You need to add an environmental variable LIB_GSL and also add the path of \bin subdirectory of your GSL installation to your PATH Environmental variable.

3.1 LIB_GSL

Create an environmental variable LIB_GSL with the path to your GSL installation. It is recommended to use Unix style path separator, / instead of \ for this:

LIB_GSL=C:/lib64/GSL

3.2 PATH

Add C:\GSL\bin to your PATH environmental variable. This is so Windows can find the two DLL files, libgsl-0.dll and libgslcblas-0.dll. Otherwise, your Cython code will compile, but it will raise the following error at runtime:

ImportError: DLL load failed: The specified module could not be found.

4 Installing CythonGSL

If you have done git clone then just cd CythonGSL and if you have downloaded .zip archive, extract it and go to the directory. Then, following the official instructions,

python setup.py build
python setup.py install

org-mode Google calendar sync in Windows

The instructions at Org-mode does not cover the Windows case. I explain how you can get the sync between Google calendar and org-mode in Windows.

1 Dependencies

1.1 ical2org.py

Get the ical2org.py script from https://github.com/asoroa/ical2org.py. You have to have Python installed, and also need to install icalendar and pytz:

> pip install icalendar
> pip install pytz

1.2 Find your private URL for your calendar

Follow step 2 in this instruction to get the private URL for your calendar.

2 PowerShell script

First check if you can download your calendar with Invoke-WebRequest:

> Invoke-WebRequest -URI <url to your private Google calendar>

If it works, make a PowerShell script file, convert-gcal-to-org.ps1:

# customize these
$ICS2ORG = "<path to ical2org.py>"
$ICSFILE = "<path for icsfile>"
$ORGFILE = "<path to orgfile>"
$URL = "<url to your private Google calendar>"

# no customization needed below
$Content = (Invoke-WebRequest -URI $URL).Content
[System.IO.File]::WriteAllLines($ICSFILE, $Content)

python $ICS2ORG $ICSFILE $ORGFILE

for example:

# customize these    
$ICS2ORG = "~/bin/ical2org.py"
$ICSFILE = "~/bin/gcal-shared.ical"
$ORGFILE = "~/gcal.org"
$URL = "https://www.google.com/calendar/ical/...../basic.ics"

# no customization needed below
$Content = (Invoke-WebRequest -URI $URL).Content
[System.IO.File]::WriteAllLines($ICSFILE, $Content) 

python $ICS2ORG $ICSFILE $ORGFILE

Now try the script and see if it works:

> convert-gcal-to-org.ps1

If you have the output org file in your org-agenda-files list, you will see the entries from Google calendar when you update your agenda in Emacs.

3 Install cron

You can install IntelliAdmin Cron to periodically run the script and sync your calendars with org-mode. Here is a blog post about this specific cron utility.

Then, use the following to set up the cronjob, with appropriate schedule settings:

EXE File
C:\Windows\System32\WindowsPowerShell\v1.0\powershell.exe
Arguments
-file C:\PATH\TO\convert-gcal-to-org.ps1

For example:

Capture-crontab-org-mode-google-sync.png

Changed the blog engine to nikola

It has been a while since the last time I updated my blog. I changed my blogging engine to nikola. Now my tool chain for writing is more streamlined, hopefully I post more frequently.

1 reStructuredText to org-mode

I do enjoy using one general tool for many tasks - I like having a consistent environment for different tasks. For example, I chose Python (a general purpose language) instead of domain specific languages such as R and MATLAB for my programming needs.

I have been looking for something like that for my writing as well, and since I used Python a lot, reStructuredText was a good candidate. With reStructuredText, I could generate output in multiple formats (html, pdf, slides), and I like the grammar.

With reStructuredText, I started using Emacs more for writing. Emacs' rst-mode is very well done, and I have been using org-mode for a while as well, even though for a while I mainly used it for the TODO list management and some outline generation only.

Then this year I started teaching, and I had multiple sections, and I started looking for ways to minimize the redundancy in course contents files. For example, syllabi for all sections of classes share many common parts and if I maintain separate files for each class, I have to modify all the files every time I make some changes on one of the common parts.

So I started writing lecture slides in reStructuredText in org-mode, putting reStructuredText code in code blocks and using org-babel to tangle the source code into output files. In that way, I just write the common parts once, and I could include them in multiple files. For slide generation, I used hieroglyph package which was great. Also I liked that I can generate document-style lecture note for distribution from the same source.

But quickly I started feeling that putting reStructuredText code inside code blocks cumbersome. In addition, I really missed the easy navigation of tree structure of org-mode. So I looked for a way to just use org-mode to write everything instead of putting reStructuredText code inside code-blocks.

Then I learned about org-export which can export an org-mode document to multiple output formats. Since then I started using org-mode to write my course notes. I had to learn a few tricks and also install org 8.3beta, but now the results has been very satisfactory. Now I write lecture note in org-mode, , and use ox-beamer to generate beamer slides for presentations, and use ox-latex to generate lecture notes from the same source. org-mode is just a pleasure to use. Now I believe I found the tool-chain for all my writing needs: Emacs and org-mode.

2 nikola

Naturally I started searching for a blogging engine which enables me to use org-mode. I have been using tinkerer for a while, and it is great, but there are a couple of steps you have to go through to use org-mode to write posts. Exporting a subtree to a .rst file is easy, but there are some manual steps involved - basically you have to add a new post to the sphinx index file either by manually or by using tinkerer.

Then I found nikola. Unlike tinkerer, nikola automatically reads files in the designated posts folder and generates index - so you don't have to manually add anything to the index. In addition, there is a tool org2nikola which generates a post from a org subtree, so I can put all my posts into one .org file.

3 Setup

You need to add the .wp file extensions to the POSTS and PAGES tuples, and also to markdown compilers in your conf.py:

POSTS = (
    ("posts/*.rst", "posts", "post.tmpl"),
    ("posts/*.txt", "posts", "post.tmpl"),
    ("posts/*.wp", "posts", "post.tmpl"),
)
PAGES = (
    ("stories/*.rst", "stories", "story.tmpl"),
    ("stories/*.txt", "stories", "story.tmpl"),
    ("stories/*.wp", "stories", "story.tmpl"),
)
COMPILERS = {
    "rest": ('.rst', '.txt'),
    "markdown": ('.md', '.mdown', '.markdown', '.wp'),
    "textile": ('.textile',),
    "txt2tags": ('.t2t',),
    "bbcode": ('.bb',),
    "wiki": ('.wiki',),
    "ipynb": ('.ipynb',),
    "html": ('.html', '.htm'),
    # PHP files are rendered the usual way (i.e. with the full templates).
    # The resulting files have .php extensions, making it possible to run
    # them without reconfiguring your server to recognize them.
    "php": ('.php',),
    # Pandoc detects the input from the source filename
    # but is disabled by default as it would conflict
    # with many of the others.
    # "pandoc": ('.rst', '.md', '.txt'),
}

3.1 Syntax Highlighting

To use highlight.js for syntax highlighting, add a definition of EXTRA_HEAD_DATA:

EXTRA_HEAD_DATA = """
<link rel="stylesheet" href="//cdnjs.cloudflare.com/ajax/libs/highlight.js/8.5/styles/default.min.css">
<script src="//cdnjs.cloudflare.com/ajax/libs/highlight.js/8.5/highlight.min.js"></script>

<script src="//cdnjs.cloudflare.com/ajax/libs/highlight.js/8.5/languages/lisp.min.js"></script>
<script src="//cdnjs.cloudflare.com/ajax/libs/highlight.js/8.5/languages/r.min.js"></script>

<script>hljs.initHighlightingOnLoad();</script>
"""

As you can see, I added syntax highlighting for lisp and r in addition to the defaults ones. You can change the theme from default to others such as solarized_light.

4 How to use

Just call org2nikola-export-subtree in the subtree that you want to export as a nikola post. It will ask you where is the root directory for your nikola blog. It seems it just uses the top level heading.